Hey, it's Nike.
Lately, I have been seeing Stack-chan a lot on X.
When I see a character displayed on a small device, talking with voice and changing expressions, it makes me want to make my own character move that way too.
So I made StackFace Maker, a local web app for creating expression assets for Stack-chan / Stack CoreS3.
In this article, I will introduce how to use the tool.
Here is the repository.
This tool was originally built based on EasyPNGTuber.
I would like to take this opportunity to thank the tool's developer, rotejin-san (@rotejin), once again.
What StackFace Maker Can Do
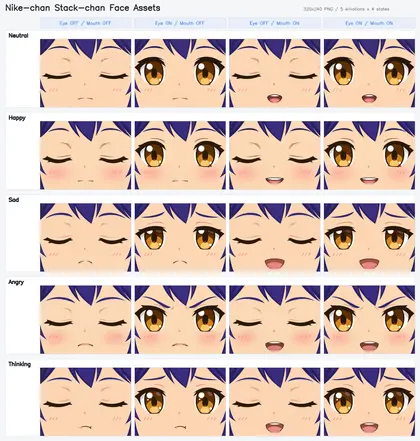
In short, StackFace Maker is a tool that creates a standard expression from a character image, then generates four eye ON/OFF x mouth ON/OFF patterns for each expression variation.
Of course, if you already have an image for the standard expression, you can skip standard-expression generation and go straight to creating the four patterns.
The Stack CoreS3 screen is 320x240, so the final output is saved as PNG images at that size.
Setup
First, clone the repository.
git clone https://github.com/tegnike/stackface-maker.git
cd stackface-maker
Install the dependencies with uv.
uv syncStart the web app.
uv run python web_app.pyOnce it starts, open http://127.0.0.1:8765 in your browser.
If you use image generation, you can enter your Gemini API key or OpenAI API key on the screen.
If you leave them blank, the app will look for the GEMINI_API_KEY / OPENAI_API_KEY environment variables.
Trying It Out
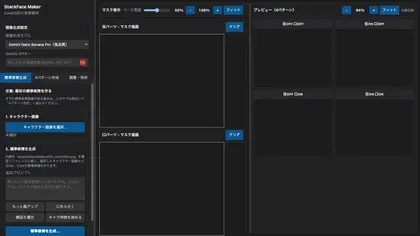
The screen has an operation panel on the left, and masks plus previews on the right.
The left side has tabs for "Standard Expression Generation," "Create 4 Patterns," and "Adjust / Save."
If you use image generation, first set the model and API key.
Optional: Create the First Standard Expression
If you do not have the first standard-expression image yet, use the "Standard Expression Generation" tab.
Here, select the character image you want to use and press "Generate Standard Expression."
Internally, the app uses sample/standard/eyeON_mouthON.png included in the repository as a composition reference, then generates a standard expression that reflects the selected character image's hairstyle, eyes, and overall feel.
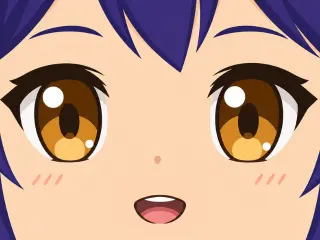
If the result looks good, press "Use this image as the standard expression" and you can move directly to the "Create 4 Patterns" tab.
If the result is a little off, add extra instructions and regenerate it.
If you already have a standard-expression image prepared, you can skip this tab.
Create the Four Patterns
First, load the standard expression.
If you have a standard-expression image on hand, select that image here.
If you use the image created in the "Standard Expression Generation" tab, it will be set as the standard expression when you accept the generated result.
The final image is created at a 320x240 aspect ratio, so you need a landscape 4:3 image.
The eye and mouth states can be either setting, but I find that starting with both ON (open) usually makes it easier to get the expression I want.
After that, generate the opposite-state image.
For example, if the standard image is "eyes ON, mouth ON," create an opposite state image with "eyes OFF, mouth OFF."
When you press "Generate Opposite State Image," the image-generation AI creates the opposite-state image.
You can also enter a prompt for the opposite state, so you might add an instruction like this:
Make the closed mouth look like a gentle smile.If you already have an opposite-state image, you can also specify it manually with "Select Opposite State Image."
Adjust the Masks
Once the standard image and opposite-state image are ready, press "Create 4 Patterns."
The app aligns the images and automatically generates masks for the eyes and mouth.
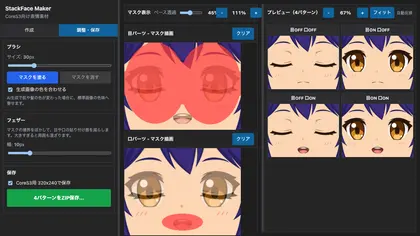
The red areas are the masks that will be replaced.
The eye parts are on the left, and the mouth parts are below. You can paint or erase each mask with the brush.
The automatically generated masks may be too large or may not select the right area, so adjust only the necessary parts while watching the preview.
When you edit the masks, the preview updates automatically.
Feather controls how much the mask edges are blurred.
Adding a little feather reduces the pasted-on look, but if it is too large, surrounding skin or hair may get blended in too.
I think starting around 5 to 12px is a good range, though the default is often enough.
Save
If the preview looks good, save it.
If you turn on "Save at 320x240 for CoreS3" when saving, the images will be resized for the actual device.
The ZIP contains a folder with the expression name, and inside it are four PNG files.
eyeOFF_mouthOFF.png
eyeON_mouthOFF.png
eyeOFF_mouthON.png
eyeON_mouthON.png
Create Expression Variations
Once you have made the four standard-expression patterns, you can create other expressions with the same workflow.
In the "Create 4 Patterns" tab, choose an expression such as "joy," "sadness," "anger," or "thinking," then press "Generate Image for This Expression" to create an expression base image from the standard expression.
If you want to create an expression that is not in the list, enter a name such as "surprised," "sleepy," or "smug face" in the custom expression field, and it will generate that expression.
With the prompt for expression images, you can also add instructions specific to that expression, such as how strong the smile should be or what angle the eyebrows should have.
Once the expression base image is ready, the rest of the process is the same as usual.
Generate or select the opposite-state image for that expression, then press "Create 4 Patterns" to create the eye ON/OFF x mouth ON/OFF assets.
When you save each expression, the folder name includes the expression name, so it is easy to organize later.
Here is what the created assets look like when lined up.
Promotion
I usually post about AI tools and AI characters on X, so I would be very happy if you followed me there.
 x.com
x.com